

If you have worked with Jetpack Compose for a while and you have done slightly ‘complex’ things, you will have needed to do magic tricks calculating sizes to align things to match a Figma design or any other designer requirements.
Let’s think about an example:

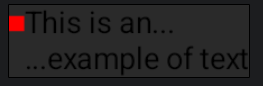
This looks pretty basic, its a Row with two children: a Box (the red square) and a Column with two children (two Texts). But… take a look, the Box is aligned with the first Text of the Column.
Hah! that’s easy, you just need to set a padding for the Box, something like this:
@Composable
@Preview(showBackground = true)
fun OnSizeChangedExampleSolution3() {
    Row(verticalAlignment = Alignment.Top) {
        Dot(modifier = Modifier.padding(top = 5.dp))
        ExampleTexts()
    }
}
And you get this:

That seems to be ok but… what if we change the size of the font or its scale due to accessibility requirements?

That’s wrong, because the solution doesn’t scale with the problem. It’s an ad-hoc solution for that exact font size. Let’s try a better solution, using the onSizeChanged modifier.
@Composable
fun OnSizeChangedExample() {
    var containerHeight by remember { mutableIntStateOf(0) }

    Row {
        Box(modifier = Modifier.height(with(LocalDensity.current) { containerHeight.toDp() })) {
            Dot(modifier = Modifier.align(Alignment.Center))
        }
        ExampleTexts(modifier = Modifier.onSizeChanged {
            containerHeight = it.height / 2
        })
    }
}
Let’s analyze what’s happening here:
- We’re sending the modifier onSizeChanged to the composable which holds the texts so that we know exactly its size.
- We store the height of the texts in a state variable divided by 2 to know the height of a single text.
- We use that stored height to set the height of the container in which the dot is ‘floating’ (it’s a Box with children alignment set to center)
And that’s the result:

Yay! it works for any text size. The problem is solved but… if we look at the onSizeChanged docs…
/**
* Invoked with the size of the modified Compose UI element when the element is first measured or when the
* size of the element changes.
*
* There are no guarantees onSizeChanged will not be re-invoked with the same size.
*
* Using the onSizeChanged size value in a MutableState to update layout causes the new size value to be read
* and the layout to be recomposed in the succeeding frame, resulting in a one frame lag.
* You can use onSizeChanged to affect drawing operations. Use Layout or SubcomposeLayout to enable the size
* of one component to affect the size of another.
*/
We have two problems here:
- Using a mutableState to store the height causes a recomposition so we need two frames (at least) to get what we want. This could be irrelevant in most of the cases but if we need to use this solution extensively, the performance will be affected.
- This can be invoked multiple times with the same size so if we need extra logic here for some reason, it will be relaunched every time.
- If we are using snapshot testing, we will need to configure it properly to be able to wait for the component to finish its drawing and become stable.
Let’s try another approach with SubcomposeLayout.
Ok, but what’s that?
SubcomposeLayout is a layout that allows us to ‘subcompose’ the content during the measurement stage in order to know its size and use it as a parameter for the children composition. In other words, you can calculate the size of the content to know how to place it.
@Composable
fun SubcomposeLayoutExample() {
    SubcomposeLayout {
        //Use an enum, index or anything different than a hardcoded string. This is just for this example
        val mainPlaceables = subcompose("main") {
            Dot()
            ExampleTexts()
        }.map {
            it.measure(Constraints())
        }

        val totalWidth = mainPlaceables.fold(0) { acc, placeable -> acc + placeable.width }
        val totalHeight = mainPlaceables.maxBy { it.height }.height

        layout(totalWidth, totalHeight) {
            mainPlaceables[0].place(
                0,
                (mainPlaceables[1].height / 4 - mainPlaceables[0].height / 2)
            )
            mainPlaceables[1].place(mainPlaceables[0].width, 0)
        }
    }
}
The process is this:
- We create a
ListofMeasurablewith that call tosubcompose. As you can see, aMeasurableis created for every composable at root level. In this case there are two: Dot and ExampleTests. - With that list of
Measurable, we can measure each item to know its size and make decisions. - Next, using the measurements of the previous step, we calculate the total with and total height required by the composables (actually, we’re taking the biggest children height as the total height).
- Finally, using the previously calculated width/height, we place the placeables (it sounds like an indie rock band or something). Take a look to the first placeable, that maths center it vertically on the first half.
And that’s it! With this approach we get the same result but avoiding extra recompositions.
We hope you find this useful, I’m thing about a new article about “responsive” headers…
See you!